
Communication and Interoperability
Čítanie 3D modelov do Revitu a ďalších 3D CAD software
BIM Simplify
If complete product definition is not required, you can transform your models to simpler representations with Simplify tools in Inventor. You can remove intellectual property from your catalog models before making them accessible to customers. Alternatively, use this workflow to prepare Revit family files in Inventor, which contain native Revit form features.
Simplify Tools for Assembly
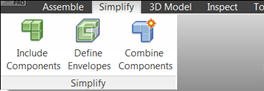
![]() Include Components Create a View representation using selected components.
Include Components Create a View representation using selected components.
 Define Envelopes Simplify a component or a part by replacing it with a set of box or cylindrical envelopes.
 Create Simplified Part Create a simplified part using the current view representation. Hidden components are not included.
![]() Recognize Revit Features – environment for Part
Recognize Revit Features – environment for Part
In the Recognize Revit Features environment, use the commands in the Simplify panel to reduce model complexity. To represent your model with features that can be recognized by Revit, use the Recognize commands in the Revit Feature panel.
![]()
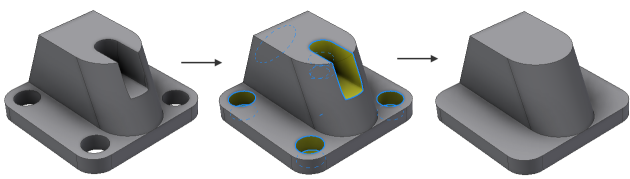
 Remove Details Simplify a model by removing recognized fillets, chamfers, or custom-selected faces.

 Fill Voids: Cap holes and pockets with surface patches that fill model voids.
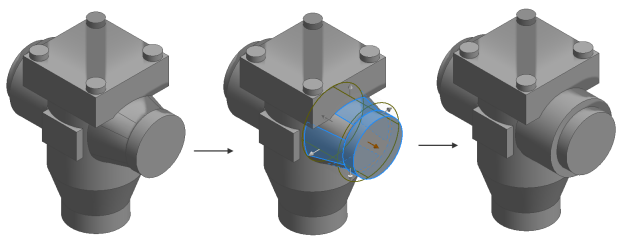
 Define Envelopes Simplify a model by replacing selected components with box/cylindrical envelopes or creating simple extrude features that represent their shape.
 Recognize extrude Recognize extrude features, and convert them to extrusions recognized by Revit.
 Recognize revolve Recognize revolve features, and convert them to revolutions recognized by Revit.
 Recognize sweep Recognize sweep features, and convert them to sweeps recognized by Revit.
 Auto Recognize Automatically recognize extrude and revolve features, and remove fillets and chamfers.
BIM Exchange
A native Revit Family file can be exported using Export Building Components in the BIM Exchange environment for Part documents. In addition, Connectors, Properties, Parameters, Orientation, Category and Insertion Point information can be added to the Revit Family file format.
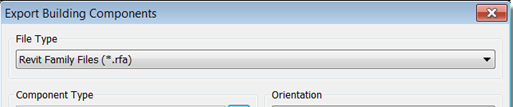
Before exporting a Revit Family file, Inventor users must prepare the model so that model features can be translated into native Revit form features. In Inventor 2014, extrude, revolve and sweep features can be translated. Inventor users can convert an existing model using the BIM Simplify environment, or they can create a compatible model by using only these three features to construct the model geometry.
![]() Check Revit Features
Check Revit Features
Displays an HTML report with information on features the model contains as defined in the Revit Family file feature translation rules.
This command is used to determine how successfully the features will be translated when exported as a Revit Family file. The report contains the status for each feature translation and the reason(s) for any unsuccessful translations.
Downstream BIM Workflow
Use the commands in the BIM tab to downstream the workflow from Simplify to BIM Feature Recognize and BIM Exchange. All BIM functions can be accessed from the BIM tab.
After finishing Create Simplified Part command in an Assembly document, you can do the following from the BIM tab in the newly created part:
- Access a report produced by the Check Revit Features command to check to make sure the Revit Features are copied from the BIM Exchange environment.
- Access Recognize Revit Features from the BIM tab if you find unsupported features after using Check Revit Features.
- Access the BIM Exchange command directly from the BIM tab to export the model to an .adsk or .rfa file.
Point Cloud enhancements
Autodesk ReCap indexes Point Cloud scan files, and creates .rcs and .rcp files that you can use in Inventor. You can collect multiple scans into a single Reality Capture Project (.rcp) file, and then attach them as a group within Inventor.
The new Insert at Origin setting allows you to insert the Point Cloud at 0,0,0 of the layout when attaching a Point Cloud. By default, the insert point is an arbitrary point (the pick point on the graphic screen).
Translators
Support for exporting the following versions is added. You can now export:
- Parasolid version 9.0 through 25.0
- Pro/ENGINEER Granite version 1 through 8.0
- CATIA V5 version R10 through V5-6R2012.
Support for importing the following versions is added. You can now import:
- CATIA V5 version R6 through V5-6R2012
- NX version Unigraphics 13 through NX 8.0
- SolidWorks version 2001 plus through 2012
- Up to Wildfire 5.0, Creo Parametric version 1.0 through 2.0
Revit interoperability sub-component
The Revit interoperability sub-component allows you to:
- Import a .rvt (Revit Project) file in the Place Component dialog box.
- Export a .rfa (Revit Family) file in the Export Building Component dialog box. A Revit Family file, is content file in Revit, such as a chiller, pump, air conditioner, furnace, tank, furniture, etc.
You must select the checkbox to install Revit interoperability functionality to interact with Revit models to extract and record building information. If you do not install the Revit interoperability sub-component, you will not be able to import and export the Revit files.
Autodesk 360
 The new Launch Website command, located in the Autodesk 360 tab, launches the Autodesk 360 website, where you manage files stored in the cloud.
You can Open from and Save files to Autodesk 360 from the top of the locations panel in file dialog boxes such as the Save As, Save Copy As, Open, Place Component and Create Component dialog boxes. Autodesk 360 is available in all file dialog boxes that include a locations panel.
While adding one file that has dependencies to the Autodesk 360, you can use Autodesk 360 to add all file references. For example, adding one assembly file that comprises ten part files adds all ten part files, and the project file. This new feature tracks and uploads/downloads the referenced files automatically.
A new Autodesk 360 drive is included in Window Explorer. You can drag and drop documents to the Autodesk 360 drive from Windows Explorer. Files added to your Autodesk 360 drive from Windows Explorer will automatically upload and sync with your Autodesk 360 account. All referenced files are uploaded during this process.
 An Autodesk 360 notification icon is automatically installed in the taskbar notification area. A message displays if any files you have added to the cloud are not in sync with the corresponding file on your local computer. Mouse over the notification icon anytime to check status.
Autodesk Inventor IdeaStation
It’s our mission to make Autodesk Inventor the world’s best design solution. But we can’t do it without you.
The Autodesk Inventor IdeaStation is a forum dedicated to improving Autodesk Inventor software by sharing your ideas for improving the product directly with the developers.
We need you to help us with our mission to make Autodesk Inventor the best design solution in the world. Do you have a great idea for a new feature or enhancement you’d like to see in Autodesk Inventor? Share your wish list directly with the Autodesk Inventor Development Team, and let us turn your ideas into reality.
Post your ideas, see what your peers are thinking, and give kudos to the ideas you like the best. The more kudos your idea receives, the better the chance of it making it into the product. At the IdeaStation, you can even track the status of ideas as they grow from initial concept to ultimate release!
The Inventor Team is listening. We consider all great ideas for inclusion in our development plan.
Share your ideas now at the Autodesk Inventor Idea Exchange.

You must be logged in to post a comment.